How To Fix A Running Toilet
A running toilet is no joke when it costs you money and wastes water.

Flush toilets became common at the beginning of the 20th century and are still very similar to those introduced over a hundred years ago. Constructed of pipes and ceramic, they have few moving parts and (usually) no electronics. Homeowners and DIYers can quickly fix many of the most common concerns, and local home centers and hardware stores likely have the parts in-stock for an inexpensive repair. It’s so common, it has become an elementary school era joke: Is your toilet running? Well, here’s how you fix it - no high-speed foot chase required.
The Basics
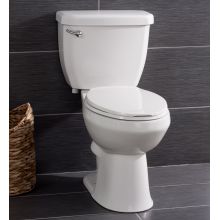
The most commonly sold type of toilet is gravity-flow. As the name implies, the gravity flow toilet doesn’t rely on any fancy technology to operate, and instead uses the predictable rules of science in the traditional design of the toilet to make it all work.
Inside the tank, a lift chain is attached to an arm at the top and a flapper valve (or “plug”) at the bottom. When the flush lever is pushed at the top, the flapper lifts and opens, so that water rushes out of the tank. The water is forced out along the rim enclosed around the seat of the toilet bowl so that it covers as much of the bowl as possible to remove waste as the water moves. At the base of the bowl, near the outlet, the water weight force creates a siphon effect that pulls the waste down the trap to drain to the sewer lines.
As you can see, there’s only one or two moving parts in a gravity-flow toilet, which makes the number of potential problems significantly smaller.
Replace the Flapper
The flapper releases water down into the bowl when the flush lever is pulled, which is what adds the force and pushes water down into the drain. The plug deteriorates over time and the seal begins to leak, allowing water to fill the bowl. And, if enough water is in the bowl, it moves constantly down the trap, into the drain, and creates a steady flow of water through your toilet. This is noisey, inconvenient, and expensive, and it means your toilet isn’t going to work when you need it to.
You can test the seal by removing the tank’s lid and pressing down on the flapper. If the water stops running, the issue is the flapper.
In most newer homes, you’ll find the toilet’s shutoff valve directly below the tank. Turn the valve and flush the toilet to empty the tank and bowl. This stops the water from running while you locate a new toilet bowl kit with a replacement flapper. The tank will need to be empty for removal and reinstallation of the new flapper, too.
Installation instructions should accompany the replacement flapper or toilet bowl repair kit. Because flappers vary from one brand or model to another, you may find it useful to take a digital picture of the flapper, paying particular attention to the way it attaches to the base of the tank. Take the picture with you to the home improvement store to ensure you buy the right replacement.
Check the Chain
Sometimes the chain connecting the flush lever and the flapper can be too short or too long, interfering with the seal. If the chain is too long, it can get caught between the tank and the flapper, or if it’s too short, the flapper isn’t allowed to close. Sometimes the chain can come off the lever entirely and just needs reattached, which is usually a very simple fix of catching the hook in the eyelet at the end of it.
To get around this hazard, carefully set the chain length on the arm. Check the length and then test it while the tank top is off, so you can ensure there is just the right amount of tension on the chain when the flush lever is activated.
Another helpful trick to get around the chain snagging is to take a plastic straw and cut it in half. Thread the straw over the chain and let it rest against the connection to the flapper. This keeps the chain lined upright and prevents any excess chain catching under the flapper.
Check the Float
There are two common types of toilet floats. The ball float, popular in older models, and the cup float. In both cases, they are water regulating devices. They attach to a metal rod that connects to the fill valve, and as the water level moves the float, the float moves the connecting piece to the fill valve. When the water level drops, the float drops, and the fill valve is engaged to refill the tank.
When the tank lid is removed, you should see the ball floating on top of the water. If the float is set too high, the water rises above the overflow pipe and drains into the bowl. Water runs continually, trying to fill the tank. If the toilet is running, lower the ball float by turning the screw on the fill valve. This reduces the water level and may stop the water from running. If the ball float has sunk to the bottom of the tank, it needs to be replaced.
Cup floats are part of a ballcock assembly designed to control the tank’s water level and slightly more complicated than the ball float. These floats attach to the fill valve shaft, with a sliding post that connects to the fill valve arm and can be adjusted up or down to keep the cup in relation to the height of the overflow pipe. When the water level set by the cup float is too high, it continually fills the tank until the water goes down the overflow, so to set that level, the cup itself has to be moved.
To do this, close the shut-off valve and flush the toilet to empty the tank. Pinch the clip and slide the float down to lower the water level, making sure that the critical level mark on the float is set one inch above the top edge of the overflow valve. It’s also a good idea to remove any buildup on the arm or adjustment clip with a fine gauge steel wool to ensure free movement. Open the valve and flush the toilet.
Inspect the Bowl Fill Tube
The bowl fill tube is the small plastic tube that connects the main fill valve assembly in the tank to the overflow pipe. It’s main purpose is to fill the bowl after the toilet has been flushed.
When the bowl fill tube is too low, it creates a vacuum within the overflow tube that pulls the excess water into the drain. This lowers the water level, which triggers the tank fill valve and the refill tube both, which together will cause the toilet to run its usual flush cycle when it shouldn’t. To avoid this, the fill tube should be adjusted above the water level of the tank, high enough to pour water into the overflow tube but not so low that it creates a vacuum in the overflow which could siphon water from the tank to the overflow.
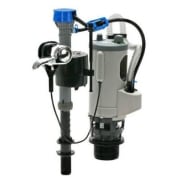
Replace the Fill Valve
The water fill valve controls the water level in the tank. If the fill tube, float, and flapper have been checked and the water is still running, the fill valve may be the culprit. Replace it if it doesn’t shut off correctly, becomes corroded, or is damaged. Experts recommend that the fill valve be replaced every five years as regular toilet maintenance. Replacement assemblies are available at most home improvement centers or plumbing supply stores. A full package may include the fill valve, refill tube, lock nut and gasket.
Once you have the replacement parts, close the shut-off valve and flush the toilet to empty most of the water in the tank. Reach into the tank and pull up on the lock ring on the assembly. Remove the refill tube from the overflow tube and slide the fill valve off the base unit. If the existing base is in good condition, remove the replacement from the rest of the assembly and move it into the current unit. Reach behind the valve and snap the lock ring into place. After attaching the refill tube to the overflow tube, adjust the new fill valve to the appropriate water level.
If the base and assembly need replacing, follow the instructions above and place a bucket underneath the water supply hose. Unscrew the hose from the tank to allow the water left in the hose to drain into the bucket. Unscrew the lock nut above the tubing to releases the base of the valve. Additional water may flow from the tank to the bucket.
Put the replacement fill valve in the position of the old unit and adjust the height to approximately one inch below the tank’s edge. Secure the lock nut and reattach the water supply hose. Snap the lock ring in place and attach the refill tube to the overflow tube. Once everything is connected, open the shut off valve and test the new system to check the water levels. Make the adjustments to ensure the new fill valve maintains the proper water level and that the toilet doesn’t continue to run.
A continuously running toilet can waste water and increase utility costs. If you’re comfortable with home repairs and doing it yourself, it doesn’t need to be a daunting task. Toilet design hasn’t changed a lot in a century. However, if the basic considerations outlined here don’t solve the issue, call your preferred professional in for the job to avoid any other lurking issues. The toilet may be of vintage design, but it is an important part of your home and you want to keep it working at peak performance.